Thêm Ô Like Facebook Page Tuyệt đẹp

Bạn luôn muốn blog mình đẹp đẽ không rắc rối vì phải thêm facebook page của bạn vào làm cho nó rối thêm. Đừng lo hôm nay mình sẽ giúp bạn!!

B1: Đang Nhập vào Blog ⇒ vào phần bố Cục ⇒ chọn Thêm HTML/JavaScript
Code:

<style>
#fbox-background {
    display: none;
    background: rgba(0,0,0,0.8);
    width: 100%;
    height: 100%;
    position: fixed;
    top: 0;
    left: 0;
    z-index: 99999;
}
#fbox-close {
    width: 100%;
    height: 100%;
}
#fbox-display {
    background: #eaeaea;
    border: 5px solid #18a2f7;
    width: 410px;
    height: 235px;
    position: absolute;
    top: 32%;
    left: 35%;
    -webkit-border-radius: 5px;
    -moz-border-radius: 5px;
    border-radius: 5px;
}
#fbox-button {
    float: right;
    cursor: pointer;
    position: absolute;
    right: 0px;
    top: 0px;
}
#fbox-button:before {
    content: "THÍCH TRANG BLOG BAO MAT";
    padding: 5px 8px;
    background: #18a2f7;
    color: #eaeaea;
    font-weight: bold;
    font-size: 10px;
    font-family: Tahoma;
}
#fbox-link,#fbox-link a.visited,#fbox-link a,#fbox-link a:hover {
    color: #0000EE;
    font-size: 11px;
    text-decoration: Tahoma;
    text-align: center;
    padding: 5px;
}
</style>
<script type='text/javascript'>
//<![CDATA[
jQuery.cookie = function (key, value, options) {
// key and at least value given, set cookie...
if (arguments.length > 1 && String(value) !== "[object Object]") {
options = jQuery.extend({}, options);
if (value === null || value === undefined) {
options.expires = -1;
}
if (typeof options.expires === 'number') {
var days = options.expires, t = options.expires = new Date();
t.setDate(t.getDate() + days);
}
value = String(value);
return (document.cookie = [
encodeURIComponent(key), '=',
options.raw ? value : encodeURIComponent(value),
options.expires ? '; expires=' + options.expires.toUTCString() : '', // use expires attribute, max-age is not supported by IE
options.path ? '; path=' + options.path : '',
options.domain ? '; domain=' + options.domain : '',
options.secure ? '; secure' : ''
].join(''));
}
// key and possibly options given, get cookie...
options = value || {};
var result, decode = options.raw ? function (s) { return s; } : decodeURIComponent;
return (result = new RegExp('(?:^|; )' + encodeURIComponent(key) + '=([^;]*)').exec(document.cookie)) ? decode(result[1]) : null;
};
//]]>
</script>
<script type='text/javascript'>
jQuery(document).ready(function($){
if($.cookie('popup_facebook_box') != 'yes'){
$('#fbox-background').delay(6000).fadeIn('medium');
$('#fbox-button, #fbox-close').click(function(){
$('#fbox-background').stop().fadeOut('medium');
});
}
$.cookie('popup_user_login', 'yes', { path: '/', expires: 7 });
});
</script>
<div id='fbox-background'>
<div id='fbox-close'>
</div>
<div id='fbox-display'>
<div id='fbox-button'>
</div>
<iframe allowtransparency='true' frameborder='0' scrolling='no' src='//www.facebook.com/plugins/likebox.php?
href= https://www.facebook.com/blogbaomat&width=402&height=255&colorscheme=light&show_faces=true&show_border=false&stream=false&header=false'
style='border: none; overflow: hidden; background: #fff; width: 400px; height: 200px;'></iframe>
<div id="fbox-link">Nhấn - [Thích Trang] - Đã Rồi Tắt Nhé :* <a style="padding-left: 0px;" href="//Hungbbsh.com" rel="nofollow">Hung Bbsh</a></div>
</div>
</div>

Hướng Dẫn Đưa Game Vào Blogspot


Game là một thứ không thể thiếu trong đời sống hằng ngày trên internet, chúng ta lên trên các trang web và chơi một game nào đó. 

- Đầu tiên chúng ta vào 3 trang dưới này để get  code về

  1. http://www.miniclip.com/games/en/webmaster-games.php
  2. http://www.freegamesforyourwebsite.com/
  3. http://www.addictinggames.com/gotd/games_for_your_site.html
- Sau đó các bạn vào phần Bố Cục => Thêm Tiện Ích => Html/JavaScript rồi dán code vừa get được từ game trong 3 website đó sau đó nhấn lưu.

add game for blog


Hoặc bạn cũng có thể lấy code game Flappy Bird tại đây:


/<embed src="http://game.24h.com.vn/upload/2014/2014-1/game/2014-02-08/Game_FlappyBird.swfwidth="400" height="555" quality="high" pluginspage="http://www.macromedia.com/go/getflashplayer" type="application/x-shockwave-flash" menu="false" wmode="transparent"></embed>

copy bỏ cái / ra 

Chú ý: Các bạn cần sửa những chữ màu đỏ cho phù hợp

http://game.24h.com.vn/upload/2014/2014-1/game/2014-02-08/Game_FlappyBird.sw : là link game Flash bạn up lên Host của bạn. Thường bạn vào mấy web kia nó sẽ cung cấp cho bạn toàn bộ code rồi các bạn chỉ việc copy rồi về chèn thôi.Nếu ko có bạn thử mở code (ctrl + u) đó ra và tìm file có đuôi .swf thử xem

width="400" height="555"  : là chiều ngang và chiều cao của khung game

Tạo ô Share cho Blog


1 Bước Duy Nhất : Đặt đoạn code dưới sau thể </body>


<style>
/* Fixed Positioned AddThis Toolbox */
.sharing_box {
position: fixed;
top: 10%;
right: 0;
border: 3px dashed #F60;
padding: 5px 5px 1px;
-moz-border-radius: 4px;
-webkit-border-radius: 4px;
border-radius: 4px;
background: #FEB;
width: 60px;
min-height: 345px;
z-index:8000;
}
.sharing_box .item {
width: 50px;
margin: 5px 0 5px 0;
}
.twitter_float iframe
{
width:55px!important;
}
</style>
<!-- SHARING BOX Fixed-Positioned Toolbox -->
<br />
<div class="sharing_box">
<div style="margin-top: 5px; text-align: center;">
<img alt="Share Emphasis" height="46px" src="https://blogger.googleusercontent.com/img/b/R29vZ2xl/AVvXsEjZOjfzuolkqxSwNOdymsaOiuHtezoXGOTi_bbodsbNZJmEYF6Qoa-ht11BcLAJKbdmWR1Qs-mUX1X5mXJeZ_JvwXNJX5nQRnX8IdLtDmAAdz_t1J88ARLAz4GuBG8toOiIaSAMi_ykh18/s56/share_mark.gif" width="56px" />
</div>
<!-- TWITTER -->

<br />
<div class="item twitter_float" style="margin-left: 3px;">
<a class="twitter-share-button" data-count="vertical" data-lang="en" href="https://twitter.com/share">Tweet</a>
</div>
<!-- FACEBOOK -->

<br />
<div class="item" style="margin-left: 3px;">
<div class="fb-like" data-font="verdana" data-layout="box_count" data-send="false" data-show-faces="true" data-width="44">
<div id="fb-root">
</div>
<!-- G+ -->

<br />
<div class="item" style="margin-left: 5px;">
<!-- Place this tag where you want the +1 button to render -->
<g:plusone size="tall">
</g:plusone></div>
<!-- OTHERSHARE -->

<br />
<div class="item" style="margin-left: 5px;">
<!-- AddThis Button BEGIN -->

<br />
<div class="addthis_toolbox addthis_default_style ">
<a class="addthis_counter" href="https://www.blogger.com/null">
</a></div>
<!-- AddThis Button END -->
</div>
</div>
<!-- FAST SHARING SCRIPT -->
<!-- TWITTER SCRIPT -->
<script>!function(d,s,id){var js,fjs=d.getElementsByTagName(s)[0];if(!d.getElementById(id)){js=d.createElement(s);js.id=id;js.src=&quot;//platform.twitter.com/widgets.js&quot;;fjs.parentNode.insertBefore(js,fjs);}}(document,&quot;script&quot;,&quot;twitter-wjs&quot;);</script>
<script>(function(d, s, id) {
  var js, fjs = d.getElementsByTagName(s)[0];
  if (d.getElementById(id)) return;
  js = d.createElement(s); js.id = id;
  js.src = &quot;//connect.facebook.net/en_GB/all.js#xfbml=1&quot;;
  fjs.parentNode.insertBefore(js, fjs);
}(document, &#39;script&#39;, &#39;facebook-jssdk&#39;));</script>
<!-- G+ SCRIPT -->
<!-- Place this render call where appropriate -->
<script type="text/javascript">gapi.plusone.go();</script>
<!-- STUMBLEUPON SCRIPT -->
<!-- Place this snippet wherever appropriate -->
<script type="text/javascript">
(function() {
  var li = document.createElement(&#39;script&#39;); li.type = &#39;text/javascript&#39;; li.async = true;
  li.src = &#39;https://platform.stumbleupon.com/1/widgets.js&#39;;
  var s = document.getElementsByTagName(&#39;script&#39;)[0]; s.parentNode.insertBefore(li, s);
})();
</script>
<script src="https://s7.addthis.com/js/250/addthis_widget.js#pubid=ra-527f9aa5427486be" type="text/javascript">
<!-- AddThis Button END -->
</div>
</script></div>
</div>


Tạo ô Viết Code cho Blog


Cách làm như sau:

1- Đăng nhập vào Blog
2- Vào mẫu (template)
3- Chọn chỉnh sửa HTML (EditHTML).
4-  Nhấn CTRL + F để tìm dòng </b:skin> hoặc ]]></b:skin> như hình dưới:
tao o viet code vao blog

5- Thêm đoạn code dưới ngay trên dòng ]]></b:skin> vừa tìm được.

.codeview { margin : 15px 35px 15px 15px; padding : 10px; clear : both; list-style-type : none; background : #f9f9f9 url(https://blogger.googleusercontent.com/img/b/R29vZ2xl/AVvXsEhr3GlLiqGC3FPbtuazbFEA5XgQI62Pmb3SJb9svO15_My-aJYG0Cp2s81v5HYM1LHw10mNRjUXCXTxoufDHy44bomUcIvnTfGmm2koJIsZ-RV4jtl-6gSsYiplKwDHCqxoiccEJZfLrFJ0/s1600/box-code-6.png) no-repeat right bottom; border-top : 1px solid #eeeeee; border-right : 2px solid #cccccc; border-bottom : 2px solid #cccccc; border-left : 1px solid #eeeeee; } .codeview li { font-size : 13px; line-height : 24px; font-family : "Courier New", "MS Sans Serif", sans-serif, serif; color : #333333; font-weight : normal; margin : 0; padding : 0; } 

6- Lưu mẫu lại - Ok thế là bạn đã chỉnh sửa xong phần HTML

 7- Để ghi code vào ô chúng ta 
<div class="codeview">
Đặt code vào tại đây
</div>

Những lưu ý cần biết khi chuyển Video Từ Youtube qua Webside

Những lưu ý cần biết khi chuyển Video Từ Youtube qua Webside

Có thể bạn không biết thì Webisde là một hình thức được lập trình trên hai mã phổ biến đó là HTML và PHP. Nhưng những người không biết lập trình sẽ thấy khó khi chuyển video từ Youtube qua Webisde. Vậy làm sao để ta chuyển video từ youtube qua Webside một cách dễ dàng. Ok chào mừng các bạn đến với Tutorials blogspot số 1.

 👉Bắt đầu nào
Bước 1:
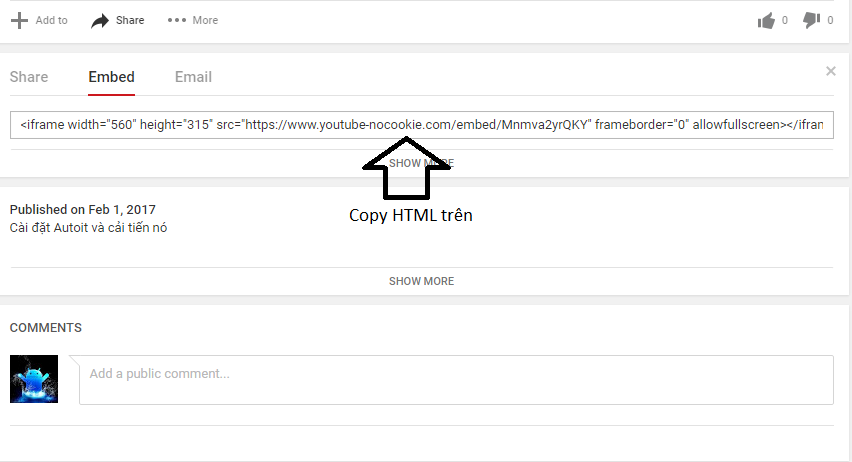
         Copy html
từ youtube :
 
Cơ bản:
            Vào Share 👉 Ember 👉 Copy HTML
 Nâng cao:
   Vào Share 👉 Ember 👉 Show more👉 Copy HTML
Bước 2: Chuyển video từ youtube qua Webisde 
  C1:
        Chuyển từ Viết sang HTML và past HTML  lấy từ Youtube vào phần HTML
C2:
      Paste mã html vào bài viết  👉Mở phần tùy chọn 👉 Dịch HTML đã nhập
------------------------------------------------------------------------------------------------
chúc bạn thành công. 
Nếu thấy hay thì bạn có thể Like và share bài viết này
đừng quên Subscribe để nhận được bài viết mới nhât
--------------------------------------------------------------------------------------